3 Ways to Recover Deleted iPad Photos from iTunes Backup
The iPad’s camera lets people record precious memories and moments in the form of images. But sometimes, you would run into the trouble of losing important photos on your iPad. What should you do? The good news is, if you have regular backups made by iTunes, you can probably recover photos from iPad backup. Here we’ll cover three ways to get back iPad photos from backup. Choose the most appropriate one for your situation.

Method 1: Recover Deleted Photos from Recently Deleted
Whenever you deleted or lost a photo on iPhone or iPad, first remember to check on Recently Deleted folder. Since iOS 8, deleted photos on iPhone/iPad will directly go to an album named “Recently Deleted” and stay there for 30 days in case of user’s regret before permanent deletion.
- After you deleted a photo, tap on “Albums” on the bottom of the iPad Photos app, and scroll down to “Recently Deleted”.
- Enter that folder and find the deleted photo, you can restore it by clicking the “Recover” button, or just permanently delete it from iPhone immediately.

If you currently don’t have your iPad, you can check the Recently Deleted folder on iCloud.com with your Apple ID (only if you’ve enabled iCloud Photo Library), or follow the next method to recover photos from backup.
Method 2: Extract Photos from Backup with iPad Backup Extractor
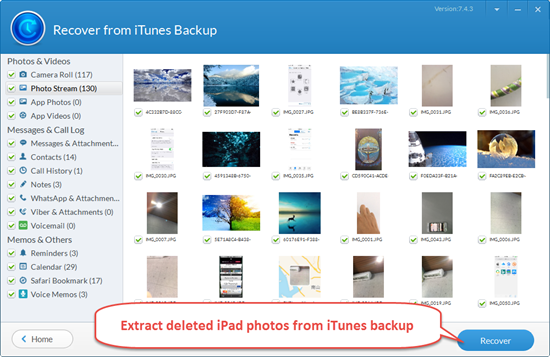
If your iPad is lost or broken and you only have an iTunes backup, you’ll need to extract photos from the iPad backup unless you are willing to restore the whole device. This can be done through a third-party software, iPad Backup Extractor, which can access and scan your iPad backup file, offering a preview of the images and helping you restore only photos from iTunes backup at once.
Using this iPad Backup Extractor is extremely simple, just install the program on the computer and follow the steps below to retrieve photos from iPad backup.
- Run the software. It will automatically detect the backups available on the computer. Select the iPad backup you need to extract photos from and click “Next”.
- Select Camera Roll, Photo Stream and App Photos from the listed file types, then tap “Next” to begin scanning the iPad backup file.
- After scan, preview all the images found. Then mark those you need and click on the “Recover” button to save them on your computer.

Method 3: Recover Photos from Backup by Restoring Your iPad
If you have your iPad on hand without any damage, the simplest way to restore photos from iPad backup is to fully restore iPad from the most recent iTunes backup. This is super easy, though it will also wipe out any new data that hasn’t been backed up.
- Before you restore your iPad, you can use the iTunes Backup Extractor to view and check whether the iTunes backup has the photos you need.
- Then just connect your iPad Pro/iPad Air/iPad mini to the computer and launch iTunes. Then tap File > Devices > Restore from Backup and wait the process finished.
Extra Tips:
- Please do not sync your iPad to computer with iTunes immediately after you lost the photos, otherwise the previous iTunes backup file will be updated, and you’ll lose the chance to recover photos from iPad backup. Before connecting iPad to computer, open iTunes > Edit > Preferences > Devices and tick on “Prevent iPods, iPhones and iPads from syncing automatically”.
- If you have enabled encrypted backups in iTunes, the Free iPad Backup Extractor will not be able to preview and restore your photos. In that case, you’ll need to upgrade to the Pro version to unlock all features including recovering photos from encrypted iPad backup.
- If you’ve synced your iPad photos with iCloud before, you can also restore pictures from the previous iCloud backup.
- Besides photos, the professional iTunes Backup Extractor is also able to export other data such as messages, voicemails, contacts, WhatsApp/Viber chats, videos and so on from iTunes backup easily.


