How to Delete iPhone/iTunes Backup on Your Mac or PC

It is highly required for iOS users to make regular backups for their iOS devices, including the iPhone, which helps in restoring the lost data. iTunes is an alternative way to iCloud for backing up iPhone data, and it stores those backup files on the computer. Thus, many iPhone users prefer to back up data through iTunes. However, with the increase in the size and number of backup files, you will find that a lot of space on your computer, especially the disk C, has been eaten up gradually by these iPhone backup files. For relieving the burden of your computer, it is also necessary to clean up old backup files regularly to free up more storage on the computer. In this article, we will tell you how to delete iPhone backups on the Mac or PC.
- Part 1. Preview and Extract Data You Need before Deleting Backup
- Part 2. Common Way to Delete iPhone Backup on Mac and PC
- Part 3. An Alternative Way to Delete iPhone Backup on Mac
- Part 4. Delete iPhone Backup on PC from Disk Drive Directly
- Bonus: How to Prevent iTunes Auto Backup
Part 1. Preview and Extract Data You Need before Deleting Backup
It is advisable to preview the iTunes backup contents before you start to delete iPhone backups as there can be several backups of different iOS devices on your computer. Besides, old backup files may contain some data that you want to preserve like precious photos, videos, and voice memos. Therefore, you’d better extract out these data before deleting the old iTunes backups.
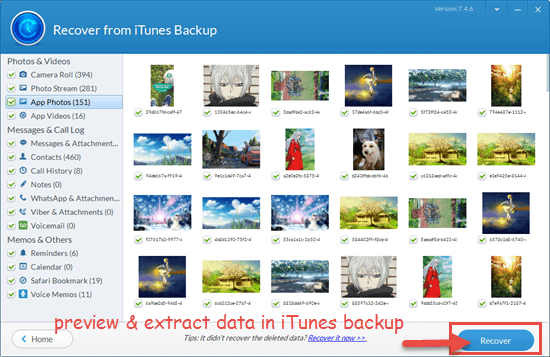
As we know, an iTunes backup is an encrypted file fragment and not human-readable. But you can turn to a third-party iPhone Backup Extractor to help you manage it. This tool allows you to view up to 12 types of data in the iTunes backup, including photos, contacts, messages, notes, etc. for free. You can download the free trial to give it a try. But you need to pay for extracting the data you need. Here are detailed steps to use this tool.


- Step 1: Download and install the iPhone Backup Extractor on your Mac or Windows PC.
- Step 2: Launch this program, then you will be presented with a list of all the iPhone backup files stored on your computer.
- Step 3: Select a backup file from the list and click the Next button to specify the file types for scanning. All file types are checked by default, but you can untick those you don’t need.
- Step 4: When the scan is over, all the scanned files will be well-organized in lists. You can click each category to preview the contents. If you want to extract some data, tick them and click on the Recover button to save onto your computer.

Now you have previewed the iPhone backups on your Mac or PC and extracted the data you want to preserve. Let’s get started with how to delete iPhone backup from the computer.
Part 2. Common Way to Delete iPhone Backup on Mac and PC
You can easily delete iPhone backups on your Mac or PC through iTunes, which is a commonly used way. The detailed steps for this way are as below.
- For Mac, go to iTunes > Preference. For Windows, open iTunes and go to Edit > Preference.
- Click the Devices tab in the pop-up window; then you will see a list of all the backups created till now.
- Select the iTunes backup you want to delete from the computer, then click the Delete Backup button.
- Click the Delete button in the small pop-up dialog box to confirm it.

Part 3. An Alternative Way to Delete iPhone Backup on Mac
There is an alternative way to delete iTunes backup on the Mac. In this way, you can check if your iPhone or iPad backups take up lots of space on your Mac. Now let’s see how to do it.
- Step 1: Select the Apple button on the top left and click About This Mac.
- Step 2: Select the Storage tab to see how much each category of files takes up on the Mac.
- Step 3: Click the Manage button and then the iOS Files option in the left panel.
- Step 4: Now, you can see the iOS backup files stored on your Mac. Highlight the backup files you no longer need, then click the Delete button.
- Step 5: Click the Delete again to confirm it.

Part 4. Delete iPhone Backup on PC from Disk Drive Directly
If you use a Windows PC, you can delete those old iPhone backups stored on your PC from disk drive directly.
- Step 1: Go to the Search bar. For Windows 7, click Start; for Windows 8, click the magnifying glass in the top right corner; for Windows 10, click the Search bar next to the Start button.
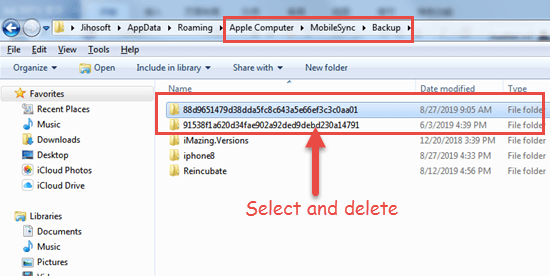
- Step 2: You can type or copy and paste %appdata% in the Search bar, then press Enter key.
- Step 3: Navigate to Apple Computer > MobileSync > Backup, then you will see a list of folders with each containing a certain iTunes backup.
- Step 4: Select a folder or several backup folders and delete them.

Bonus: How to Turn off iTunes Auto Backup Feature
By default, iTunes will create a backup of your iPhone automatically when you sync your iPhone on the Mac or PC. You can turn off the automatic backup feature in iTunes to potentially save storage space on the computer.
- Go to Edit > Preference if you are using a Windows PC. Go to iTunes > Preference if you are using a Mac.
- Click the Devices tab in the initiated window.
- Untick the Prevent iPods, iPhones and iPads from syncing automatically option, then click the OK button.
- Connect your iPhone to the computer and click on the device icon when it appears in iTunes.
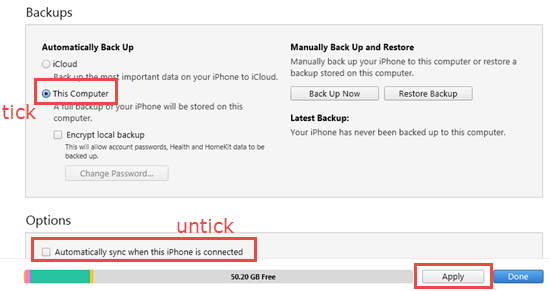
- Tick This Computer option in the Backups section and untick the option to Automatically sync when this iPhone is connected in the Options section.
- Click the Apply button.

Afterward, your iPhone won’t automatically back up your data to iTunes each time you connect your iPhone to the computer.
Conclusion
Compared to iCloud, we are allowed to create much more backups on our Mac or PC. But no matter how much memory the computer has, you need to regularly delete iPhone backup on Mac or PC to keep files well organized. We recommend you to preview and extract the data you need in various iTunes backups via an iPhone backup extractor beforehand. After deleting iPhone backups in iTunes, you may turn off the iTunes auto-backup feature to save storage space on your Mac or PC. If you have any queries or suggestions for us, please leave them in the comment section below.
